We’ve previously discussed the ability of the NetSwap NAS devices being able to encrypt using the Truecrypt algorithm. In this Blog, we’ll do a detailed walk through of setting it up.
High-Rely NetSwap Plus Encryption Setup Guide
Your NetSwap Plus Device is ready for Volume Encryption straight out of the box. Volume Encryption on the NetSwap Plus is compatible with TrueCrypt, in format and encryption/hash algorithms, and encrypted volumes are compatible with the TrueCrypt software for Windows, and Linux.
WARNING: To setup encryption on a drive, you will need to re-format a drive, causing a loss of all data!
To setup a drive with encryption, you will need to logon to the Web Interface for your NetSwap Plus Device, to make sure the drive is not shared either via NAS, or iSCSI.
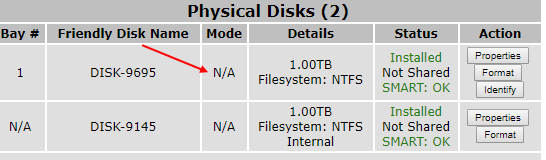
Once it is determined, the drive is not shared over the network, the next step is to format the drive and setup encryption.
Under the Action header, select Format.
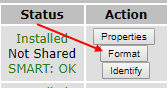
This will take us to the Format and Partition Disk menu, where we will format the drive and choose our encryption settings.
The first two sections, Disk Identification and Partition Settings, can be left as is.
Under Encryption Settings, check the box to Encrypt Data. We will leave the box to use file container unchecked. Next, we will choose our Password (key) that will be used to unlock the encryption Algorithm. It is recommended that the password is at lest 20 characters in length, uses a combination of lower and uppercase letters, numbers, and special characters. It is also recommended that names, dates of birth, or words found in a dictionary should not be used.

Next, we select the encryption and hash algorithm methods. We recommend using AES and SHA-512, however, other options can be viewed and selected from the drop-down boxes for each.
The use of weak keys and secure erase check-boxes are optional, and their description can be found on the right-hand sidebar, under the Encryption Settings subhead. The last section, File System Settings, can also be left as is.
Once all of our options have been selected we will go ahead and format the disk.
Once disk has completed formatting, on the disk status screen, we will now see that the disk is showing as an encrypted volume under Details.
![]()
We are now ready to share the encrypted drive. Begin by going to properties, under the Action sub-head. Once we are in the disk properties menu, we are able to select the share method for the disk.
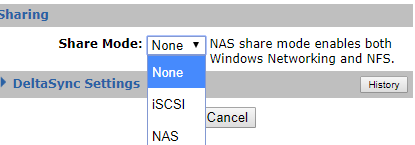
Go ahead and choose between either NAS, or iSCSI, depending upon your preference. In this example, we will be going over a NAS share.
Select NAS, as your share mode, and give the disk a share name. The next step in to expend the Mount Settings tab. These options will allow us to be able to access the encrypted drive on the network.
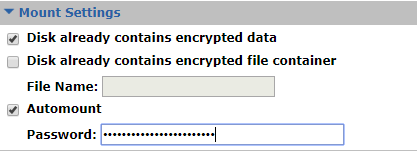
The first checkbox should already be checked as default and can be kept as is. We will leave the second check box, and its text box, both blank. We will check the Automount checkbox and insert the password we gave the encryption algorithm earlier. Once this is done, we will click Save at the bottom of the page and proceed with the next step.
After clicking Save, we can proceed back to Disk Status screen, where we can see that our encrypted volume has been shared and will now be available to access over the Network. Since we selected the Automount setting in the previous step, the NetSwap will remember the encryption algorithm key and we will not be required to enter it every time the disk is swapped.
We have now completed the steps necessary to encrypt and access the drive on the NetSwap. We will now proceed with instructions on how to mount the encrypted volume on a Windows machine, in case access to your data is needed outside of the NetSwap.
Accessing an Encrypted Netswap Drive from Windows.
Begin by downloading the TrueCrypt software, which can be found below. TrueCrypt can either be installed to the machine itself, or can be installed on a USB thumb drive to make a portable version.
https://s3.amazonaws.com/highrelydownloads/TrueCrypt+Setup+7.1a.exe
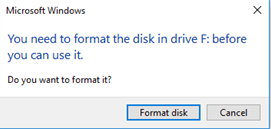
Once we have installed the TrueCrypt software, we are now ready to mount our encrypted volume. Begin by connecting the encrypted drive to your machine, via either an open HDD slot, or an external caddy. Once the drive has been connected, you will see an error message from Windows, stating that the drive will need to be formatted be use. Do not click Format disk. We will ignore this error message; click cancel and proceed.
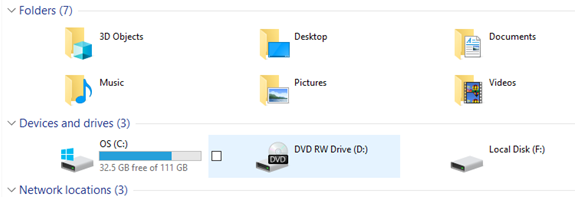
Open Windows File Explorer, verify that you are able to see the encrypted drive, and take note of its assigned drive letter. Take note that even though the drive shows in File Explorer, we are not able to access the drive.
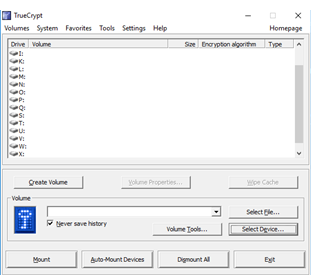
We will now run the TrueCrypt software from either the local machine, or a USB thumb drive. Upon opening the TrueCrypt software, we will be shown the Homepage. Begin by clicking Select Device down in the lower right-hand corner.
True Crypt will now scan for all available disks. Once the results are displayed, you will need to select the drive letter we took note of earlier. In this case, we would select drive letter F, which has the the device name of \Device\Harddisk1\Parttition0. Once selected, we will be taken back to the TrueCrypt Homepage, where our encrypted Volume will now be selected. Click on the Mount button below the drive and enter the Encryption key from earlier.
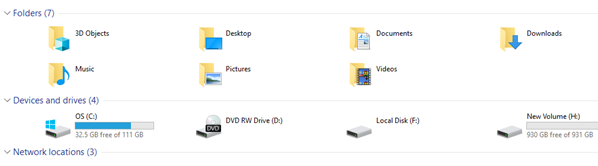
We have now successfully mounted the encrypted Volume to our Windows Machine, and have full access to our drive.
TrueCrypt also has the option to Automount the drive, however for security purpose, we recommend not to choose Automount outside of the NetSwap environment.
For further help, or any questions that may arise during setup, please contact our Technical Support department by visiting: https://www.high-rely.com/support/