A brief overview on how to create an Automatic Replication Job that will start when drives are inserted into the RNAS.
Create a new job
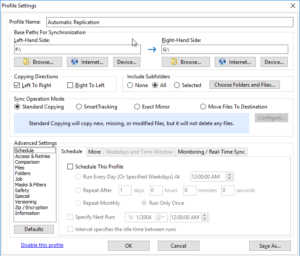
Begin by creating a new job from the Profile Overview screen. In this example we have selected two drives for our paths. The left-hand path will be the Primary Drive while the right-hand path will be our secondary drive that we will be swapping in and out. In this example we will be creating a job that will start an automatic replication of the two drives upon the secondary drive being inserted into the RNAS.
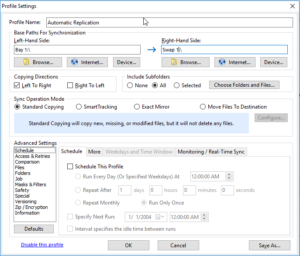
Change from Drive Letters to Disk Names
If we want the RNAS the only replicate to a certain drive when it is inserted into the secondary bay rather than any drive, we can label the path names with the Disk Names rather then the Drive Letter. For example, instead of F:\ denoting the path we can use Bay 1:\ as seen in the example below.
Profile Settings
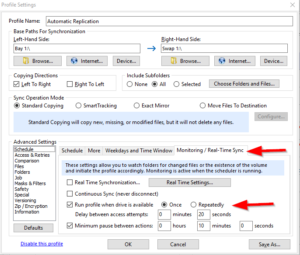
We will now select our options for the for the profile. Begin by setting the Copy Directions from Left to Right. Next, Select the Sync Operation Mode that fits your needs. In this example we will be using Standard Copying. We will now move down to the advance settings area. On the Schedule pane select the tab for Monitoring/Real-Time Sync. Next, check the checkbox for Run profile when drive is available and select Once. This setting is telling High-Sync to automatically start the job upon the detection of the drive being inserted. Because of this we do not need to schedule the job and all other options can be left as is.
Running the Job
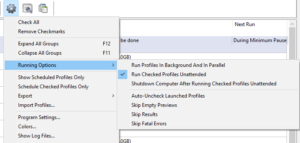
After saving the profile and giving it a name, we will be taken back to the Profile Overview page where we can see our Job is now listed. Go ahead and check the checkbox next to the profile and then click on the gear icon on the top taskbar. We will now go down to Running Options and select Run Checked Profiles Unattended. This will allow High-Sync to schedule the Job and run it without any input required by the user.
We can now press the play button to start to Job and we are finished. You are now able to swap drives as needed, and High-Sync will do the rest.